 |
|
 |
 |
Subscribe to our mail list |
|
|
 |
 |
Quick Start |
|
 |
XSpy Shield: Quick Start
|
 |
|
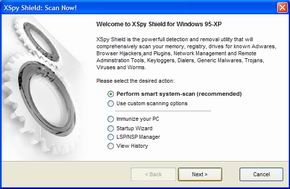
To get started launch XSpy Shield and press Ctrl+S. This will bring the scanning wizard to the foreground. In order to start scanning process with the default options check the first option (Perform smart-system scan (recommended)) and press Next button.

XSpy Shield will scan your system for parasites using the most common options. In case you would like to change the settings then you will have to choose option #2 (Use custom scanning options) on the 1st step. Anyway when you go on to the step #2 by pressing Next button XSpy Shield will start to scan your system for viruses. Depending from the scanning settings and speed of your PC the scanning time may vary greatly. You can estimate the approximate scanning time for each location (files, registry, cookies etc) by taking a look at the progress bar at the bottom part of the window.
When the scanning is finished you will be presented
with the brief statistics on number of found objects in each category. Click Finish
and you will be brought to the main program's window where the top tree is filled with the names
of found parasites. Each found object usually contains several entries (files, registry keys etc).
The bottom tree will display the detailed information about the virus (description, danger level etc)
which is selected in the top tree.

At this step you can either check few viruses from the top list and press Remove Selected button. If you want to remove all found parasites then use Remove All button from the toolbar at the top part of the window.
You can always undo removal of parasites items by clicking the corresponding button at the toolbar. In case you have selected to move infected items to quarantine you also will be able to restore them later.
|
 |
|
 What's New What's New  Press Releases Press Releases  FAQ FAQ  Quick Start Quick Start
 
|
|
|