|
This time you'll be guided through the basic steps needed for creating custom figures using ellipses and curves as main elements. Current tutorial also touches work with curves on the deeper level than that in the tutorial #1. By the end of this tutorial you'll get a flower.
1. Startup Business Card Studio. Choose menu File->New->Create Empty Project.
2. Adjust size of new document: menu File->Properties. Set document width and height to 354 and 300 pixels correspondingly.
3. Locate grid toolbar in the top upper corner of the document's window. Select both tools: Show grid( ) and Snap to grid( ) and Snap to grid( ). ).
4. Choose Ellipse from the Draw tools toolbar located leftwards. Press and hold Ctrl key (holding Ctrl key is needed to draw a circle), click with the left mouse button somewhere in the client area of the document. Begin dragging mouse cursor to produce a circle.
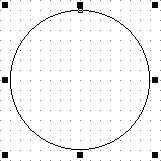
5. In the Curve edit tools toolbar that is located at the bottom of the window press Convert selected objects to curve objects. Press Flatten selected curve button (it's the 4th button from the right in the same toolbar). Now select Curve edit tool button from the Draw tools toolbar. Now you should be able to see numerous points on your circle.

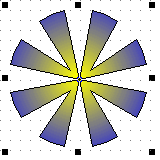
6. Now mark the topmost point of your circle (now it's a curve) and drag it to the center. Repeat the procedure with the leftmost, rightmost and bottommost points. Then if you wish you can repeat the procedure for the central points of the produced sectors (this is to your like whether to drag them to the center or not). Choose an elliptic gradient fill with blue and yellow start and end color correspondingly.
7. Select Line button from Draw tools toolbar. Select Curve edit tool and hold Ctrl while adding new points of the polygon. Select Convert selected segments to curve from the Curve edit tools toolbar after you select each point of the curve. Now when you click on any point of the curve you'll see two additional marker points which will allow you to transform your polygon to a flat curve. Flat correction is performed separately for each segment of the polygon line.
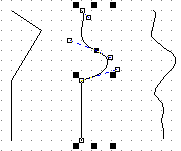
8. Turn off Snap to grid option as we're about to connect the curve to the center of the Figure we've produced on the step 5.
9. Using the same techniques draw new line and add to it a dozen of points. Try to get it look like a flower's leaf.

10. Connect leaf to the stalk. Copy of it by using a popup menu which appears when your right mouse click on the selected object. Then Paste it and mirror reflect it horizontally relatively to the stalk. Before you make the final step make sure that both leaves are presented with a closed polygon lines (curves). If so then adjust gradient fill of the leaves to the TopLeft and TopRight values for left and right leave correspondingly; start color - Lime, end color - Green. Select all objects and press Ctrl+G - this will unite them in a one group creating a single object. Select stalk and press Ctrl+PageDown, this will bring the stalk to the background. It's done now! The resulting star can be found in the Samples directory under the name flower.crd.

|